Workstation
The Workstation is the main environment where attendants provide video service to clients. Designed to maximize productivity, the interface is divided into three columns that organize all the information and tools needed during a call.
Path: /workstationAccess: Attendant, Supervisor, Manager, or Owner
1. Workstation Layout
The Workstation features a three-column layout that distributes information intuitively:
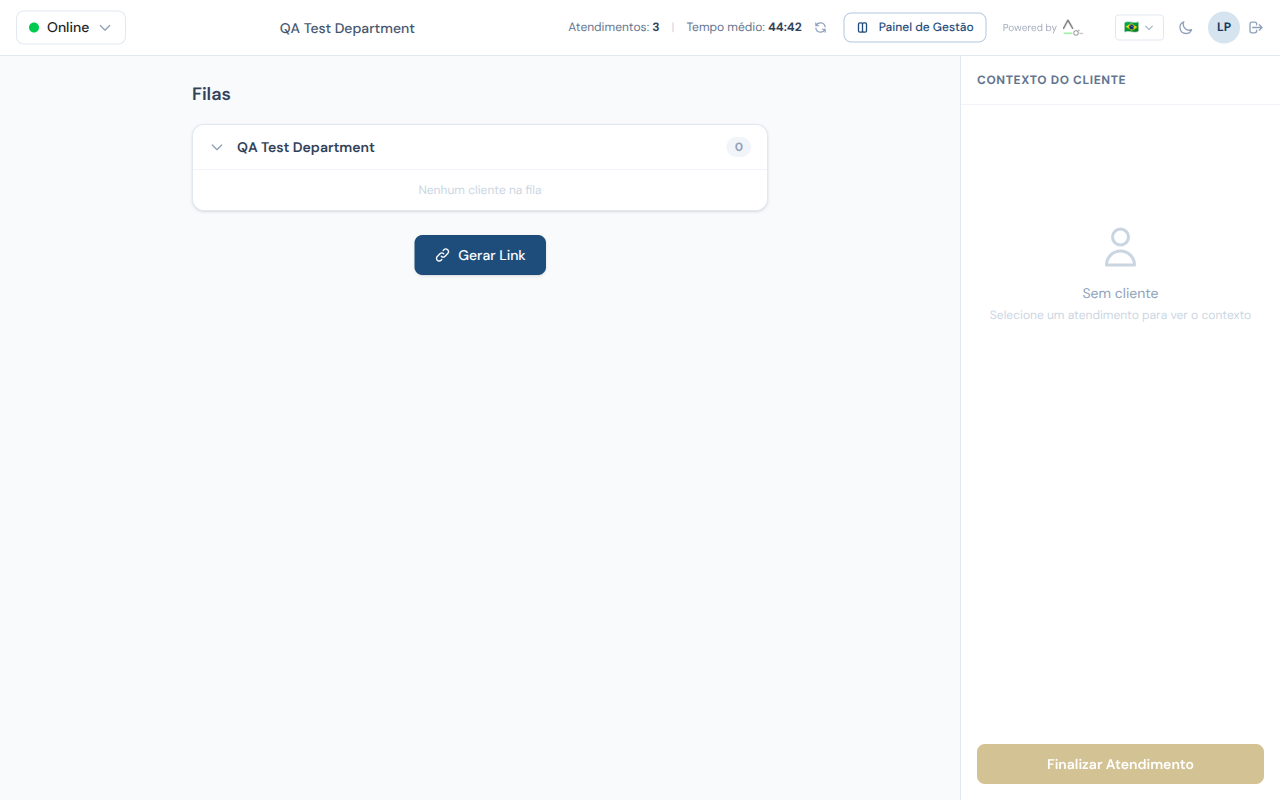
Left Column — Waiting Queue
The left column displays the queue of clients waiting for service in the departments you are assigned to. For each client in the queue, the following is shown:
- Client name — provided in the pre-service form
- Wait time — how long the client has been waiting
- Department — which department the client selected
- Reason — subject provided by the client (when filled in)
To start a call, simply click on the client's name in the queue. The video call will be established automatically.
Tip
Clients are organized by arrival order. The client who has been waiting the longest appears at the top of the list.
Center Column — Video and Communication
The center column is the main interaction area during the call. It contains:
- Video area — displays the client's video in a large format and your (attendant's) video as a thumbnail in the lower corner
- Control bar — located at the bottom of the video area, with all call controls
- Chat — real-time text messaging area, below the video
- Protocol number — displayed as an overlay on the video screen
When there is no active call, the center column displays a message indicating that the station is ready to receive calls.
Right Column — Client Context
The right column gathers all relevant information about the client being served:
- Registration data — name, email, phone, and document
- Call history — list of previous calls with dates and durations
- Internal notes — notes recorded by attendants in previous calls
- Tags — classifications and labels associated with the client
- Interaction tools — quick access to tools configured by the manager
Information
The context column is automatically populated when you accept a call. If the client is identified by email, their entire previous service history is loaded.
2. Attendant Status
At the top of the Workstation, you'll find the status selector. Your status determines whether you can receive calls from the queue.
| Status | Indicator | Description |
|---|---|---|
| Online | Green | You are available to receive calls from the queue |
| Paused | Yellow | Temporarily unavailable (lunch, break, meeting) |
| Away | Red | Automatic status when there is no response for 120 seconds |
To change your status:
- Click the status indicator at the top of the page
- Select the desired status from the dropdown menu
- The new status is applied immediately
Attention
Only attendants with Online status receive calls from the queue. If you are set to Paused or Away, clients will be directed to other available attendants in the department.
The system monitors the attendant's connection through heartbeats sent every 60 seconds. If the system does not receive a response for 120 seconds (for example, if the browser is closed without changing status), the attendant is automatically marked as Away.
3. Call Controls
Feature visible during active calls
The control bar appears at the bottom of the video area only when there is an active call. The controls described below are available throughout the entire duration of the call.
During an active call, the control bar at the bottom of the video area offers the following features:
| Control | Icon | Function |
|---|---|---|
| Camera | Camera | Turns your camera on or off. The client will see a black screen with your avatar when turned off |
| Microphone | Microphone | Turns your microphone on or off. A mute icon is displayed to the client |
| Share Screen | Monitor | Starts or stops sharing your screen with the client |
| Record | Red circle | Starts recording the call (requires client consent — see section 13) |
| Background Blur | Person | Enables or disables intelligent background blur |
| Invite | Person with "+" | Sends an invitation via email, SMS, or WhatsApp to add participants |
| Transfer | Arrows | Transfers the call to another department or attendant |
| End | Red phone | Ends the call and opens the finalization modal |
Background Blur
Background blur uses artificial intelligence (MediaPipe SelfieSegmentation) to detect the attendant's silhouette in real time and blur the surrounding environment. The AI files are processed locally in your browser — no video data is sent to external servers.
When to use:
- To maintain the privacy of your work environment
- To reduce visual distractions and convey professionalism
- In home office situations where the background is not appropriate
How to enable:
- Click the Background Blur button in the control bar
- The effect is applied within 3 seconds
- To disable, click the same button again
Tip
In addition to blur, the manager can configure custom virtual backgrounds for the department (corporate images, standardized scenes). If available, they appear as an option alongside blur.
Technical requirements
Background blur requires a browser with WebGL support (up-to-date Chrome, Edge, Firefox, or Safari). On computers with older hardware, the effect may slightly impact video performance.
4. In-Call Chat
Feature visible during active calls
The chat panel appears below the video area during an active call. Messages exchanged are visible to all call participants.
The chat area enables real-time text messaging during the video call, serving as a complementary channel to audio and video.
Common use cases:
- Share links — send URLs that the client can click directly
- Copyable data — protocol numbers, barcodes, PIX keys, and other information the client needs to copy
- Audio issues — if there are technical difficulties with audio, the chat works as an alternative communication channel
- Sensitive information — data the client prefers to type rather than say aloud
How to use the chat:
- Type your message in the text field at the bottom of the chat
- Press Enter or click the send button
- The message appears instantly to all participants
- Chat history is saved along with the call record
Tip
Chat messages are recorded in the call history and can be reviewed later by the manager in the reports section.
5. Internal Notes
Feature visible during active calls
The internal notes field is available in the right column during an active call. Notes from previous calls are also displayed for reference.
Internal notes allow the attendant to record observations about the call. These notes are visible only to the internal team — the client never has access to them.
How to record notes:
- In the right column, locate the Internal Notes section
- Type your observations in the text field
- Click Save Note or press the indicated shortcut
- The note is automatically associated with the current call and client
Information automatically recorded with the note:
- Date and time of the entry
- Name of the attendant who wrote it
- Call identifier
Tip
Notes are cumulative (append-only). Each new note is added to the history without overwriting previous ones. This ensures a complete record of all observations across interactions with the same client.
Managers and supervisors can also add Manager Notes to completed calls, visible in the reports panel. See the Manager Panel for more details.
6. Call Transfer
Feature visible during active calls
The transfer button is available in the control bar during an active call.
Call transfer allows you to redirect the client to another department or specific attendant, without the client needing to leave and re-enter the queue.
Step-by-step to transfer:
- During the call, click the Transfer button (arrows icon) in the control bar
- In the modal that appears, choose the type of transfer:
- To department — the client enters the selected department's queue
- To attendant — the client is directed to a specific attendant (if online)
- Select the destination from the list
- Click Confirm Transfer
What happens after the transfer:
- The client is automatically redirected to the new queue or attendant
- The original attendant is freed to receive new calls
- The call record maintains the complete history, including the transfer
- Internal notes and client context are preserved for the next attendant
Attention
Transfer is only possible to departments that have at least one attendant with Online status. Departments without available attendants appear disabled in the list.
7. Schedule Callback
Feature visible during active calls
Callback scheduling can be initiated during an active call through the tools panel.
The scheduling feature allows the attendant to set a future callback with the client, ensuring continuity of service.
Step-by-step to schedule:
- During the call, click Schedule Callback in the tools panel
- Select the date on the calendar
- Select the desired time
- Add notes about the reason for the callback and what needs to be addressed
- Click Confirm Schedule
After scheduling:
- The callback appears in the Schedules list in the manager panel
- The attendant receives a notification when the callback date/time approaches
- The client may receive an email reminder (depending on department settings)
Tip
Use the scheduling notes to describe what was discussed and what needs to be resolved. This way, even if another attendant handles the callback, they will have full context of the case.
8. Interaction Tools
Feature visible during active calls
The tools panel appears in the right column during an active call. Available tools depend on the department's configuration.
During the call, the attendant can access interactive tools configured by the department manager. These tools assist in service delivery and allow collecting information or performing operations without leaving the call screen.
Examples of available tools:
| Tool | Description |
|---|---|
| Credit Score | Client credit score lookup and classification |
| Calculator | Financial calculations (installment simulation, rates, etc.) |
| Quiz / Form | Structured data collection during the call |
| Checklist | Verification list for standardized processes |
| Document Analysis | Document analysis via KYC (Starter plans and above) |
How to access:
- In the right column, locate the Tools section
- Click on the desired tool
- Fill in the fields or perform the operation
- Results are linked to the call record
Tip
Tools are configured by the manager in Manager Panel > Tools. If you cannot find a tool you need, ask your department manager.
9. Multi-Participant Calls
Feature visible during active calls
The multi-participant video grid and invite button are visible when there is an active call and the company's plan includes SFU support (Starter plan and above).
When the company's plan includes SFU (Selective Forwarding Unit) calls, the Workstation supports multiple simultaneous participants in the same video call.
Video Grid
The video grid adapts automatically to the number of participants:
| Participants | Layout |
|---|---|
| 2 | Side by side (1x2) |
| 3-4 | 2x2 grid |
| 5-9 | 3x3 grid |
| 10-16 | 4x4 grid |
| 17+ | Gallery with scroll |
Each tile in the grid displays:
- Video or avatar of the participant
- Name of the participant
- Microphone indicator — icon visible when the microphone is muted
Invite Participants
To add participants to an active call:
- Click the Invite Participant button (person with "+" icon) in the control bar
- In the invite modal, select the delivery channel:
- Email — enter the invitee's email address
- SMS — enter the mobile phone number
- WhatsApp — enter the WhatsApp number
- Click Send Invite
- The invitee receives a link and, upon clicking, automatically joins the video room
Tip
Invitations contain a unique and secure link. Each link is valid only for the active call and expires when the call ends.
Active Speaker Highlight
The system automatically detects who is speaking and visually highlights the active participant's tile with a colored border. Additionally:
- You can pin a participant by clicking the pin icon on their tile, keeping them highlighted regardless of who is speaking
- To unpin, click the pin icon again
10. Co-browsing (Collaborative Navigation)
Feature visible during active calls
The co-browsing feature is available in the tools panel during an active call.
Co-browsing allows the attendant to send URLs directly to the client's browser during the call. This is useful for guiding the client through specific pages on a website, system, or online document.
How to use:
- In the tools panel, locate the Send URL option
- Type or paste the complete URL (including
https://) - Click Send
- The client receives an on-screen notification with the URL and can choose to open it
Attention
The client must accept the URL opening. The system does not automatically open links in the client's browser for security reasons.
11. Protocol Number
Each call automatically receives a unique protocol number the moment it is initiated. This protocol is displayed as an overlay on the video screen, visible to both the attendant and the client.
Protocol purposes:
- The client can write down the number for future reference in subsequent contacts
- The manager can quickly locate a specific call in reports
- It serves as proof that the service was provided
- It is automatically included in the call's notes and records
Tip
Encourage the client to write down the protocol number. If they need to contact you again about the same matter, the protocol allows you to locate the entire previous service history.
12. Finalization Modal
Feature displayed when ending a call
The finalization modal appears automatically when you click the End button in the control bar. You must fill in the fields before the station is freed for the next call.
When ending a call, the system automatically displays the finalization modal. This step is mandatory and ensures that all relevant information about the interaction is recorded.
Finalization modal fields:
| Field | Required | Description |
|---|---|---|
| Service summary | Yes | Free-text describing what was discussed during the call |
| Internal rating | No | Attendant's rating of the complexity or outcome of the call |
| Tags | No | Classifications and labels to categorize the call |
| CSAT/NPS | Automatic | If the client responded to the satisfaction survey, the data appears here |
Step-by-step:
- When you click End, the finalization modal is displayed
- Fill in the service summary with the key points discussed
- Optionally, assign an internal rating and add tags
- Click Finalize to save the record and free the station
Attention
You cannot receive new calls while the finalization modal is open. Fill in the information and click Finalize to free your workstation.
Tip
Be concise in the summary, but include enough information so that another attendant can understand the context if the client returns. Examples: "Client requested a duplicate invoice. Sent via email. 3 business day deadline communicated."
13. Recording Consent
Feature displayed during active calls
The consent flow is triggered when the attendant clicks the Record button or automatically in departments with mandatory recording. The client sees a message requesting authorization.
To comply with data protection legislation (LGPD), the system requires explicit client consent before starting any recording. The flow works as follows:
Manual Recording
During the call, click the Record button (red circle icon) in the control bar
The client receives an on-screen notification with the message:
"The attendant requests permission to record this call."
The client has two options:
- Accept — recording starts immediately and a red indicator remains visible to both parties
- Decline — recording is not initiated
If the client declines, you can click the Resend Consent button to request again
Mandatory Recording
In departments configured with a mandatory recording policy (recording_policy = full):
- When the call starts, consent is automatically requested from the client
- The client can Accept — recording begins and the call proceeds normally
- If the client Declines — the call is automatically terminated, as recording is a department requirement
Attention
In departments with mandatory recording, declining consent terminates the call. This setting is defined by the manager and cannot be changed by the attendant.
Tip
When recording is active, a red indicator is displayed on the video screen for both participants, ensuring transparency throughout the call.
14. Reconnection During Calls
If a connection drop occurs during a call (either from the attendant or the client), the system has an automatic reconnection mechanism.
How it works:
- The system detects the disconnection immediately
- A 60-second timer is started
- The participant who remained connected sees a "Reconnecting..." message with a countdown
- If the connection is restored within 60 seconds, the call resumes automatically — no need to re-enter the queue
- If the timer expires without reconnection, the call is terminated with a "disconnect" status
What to do when reconnection fails:
- Check your Wi-Fi or wired network connection
- If needed, reload the page (F5) — the system will try to restore the session
- The client can be advised to check their mobile data connection
Tip
Maintain a stable internet connection during calls. Unstable Wi-Fi or weak mobile networks are the main causes of disconnections. Whenever possible, use a wired connection (Ethernet cable).
Attention
If you reload the page (F5) during a call, recording consent remains active — it will not be requested again from the client. The session is preserved to ensure continuity.
15. PSTN Dialer (External Calls)
Exclusive feature — Enterprise Plan with PBX 3CX
The PSTN dialer is available only for companies with an Enterprise plan that have PBX 3CX integration configured. If you do not see this feature, contact your company's manager.
The PSTN Dialer allows attendants to make external phone calls directly from the Workstation, using the company's PBX 3CX integration.
How It Works
The integration uses the Click2Call protocol: when you initiate a call through Voki, the system triggers the PBX 3CX, which places the phone call through the extension configured for your user.
Making an External Call
- In the Workstation, locate the Dialer (phone icon with outward arrow)
- Enter the desired phone number in the dialing field
- Click the Call button or press Enter
- The PBX 3CX rings your extension — your phone (or softphone) rings first
- Once you answer, the call to the external number is automatically completed
Number format
For external calls, use the complete number with area code. The system automatically adds the "0" prefix for external calls when necessary. Examples:
- Mobile:
11999887766 - Landline:
1133445566
PSTN Call Records
All calls made through the dialer are automatically recorded in Voki's call history, including:
- Dialed number
- Call duration (in minutes and seconds)
- Extension used (linked to your user)
- Status (answered, unanswered, busy)
- Date and time of start and end
This information is available in the Manager Panel reports for operational analysis.
Extension Configuration
Each attendant is linked to a PBX 3CX extension by the company manager. Configuration is done in Manager Panel > PBX > Extensions. Only calls involving extensions registered in Voki are processed and recorded.
Attention
If your extension is not registered in Voki, PSTN calls will not be recorded in the system. Ask your manager to configure your extension in the PBX settings.
Call Webhooks (3CX)
The PBX 3CX sends automatic notifications (webhooks) to Voki about call statuses. This allows the system to record events such as:
- Ringing — the call is ringing
- Ended — the call has been terminated
- Duration — total call time in MM:SS format
This data is processed automatically and appears in reports without any action required from the attendant.
Quick Actions Summary
| Action | How To |
|---|---|
| Answer a client | Click on the client's name in the queue (left column) |
| Toggle status | Click the status indicator at the top of the page |
| Send a chat message | Type and press Enter |
| Enable/disable blur | Click the blur button in the control bar |
| Transfer call | Transfer button > select destination > confirm |
| Invite participant | Invite button > channel > recipient > send |
| Start recording | Record button > wait for client consent |
| End call | End button > fill in finalization modal > finalize |
| Dial external number | Dialer > enter number > call (Enterprise + PBX) |
Need help?
If you have questions about the Workstation or specific features, contact your department manager or consult the other sections of this manual.